default entries in a repeating item group
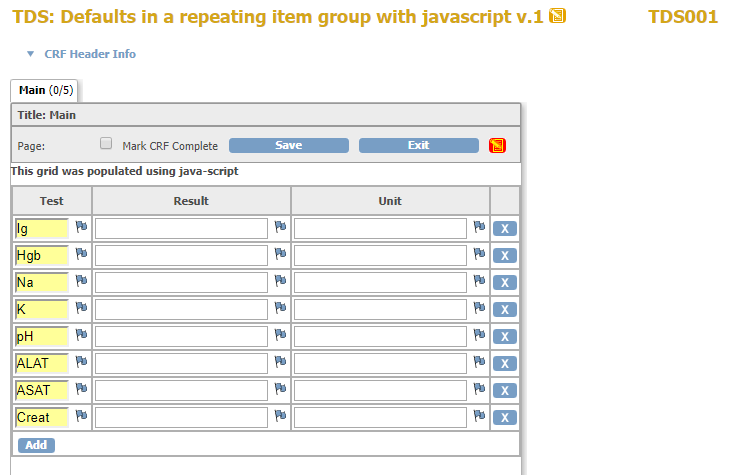
For some time we've had the option to insert values in a repeating-item-group, as described on this page, but you may need additional functionality, like making the defaults read-only and/or taking away the option to remove a line in the grid. To be able to do this we must use some java-scripting, so it makes sense to set the defaults in the same script.
fig. 1: the end result
try it for yourself
Do you want to see that on your own OpenClinica? Here is the zip-file.
what does the script do?
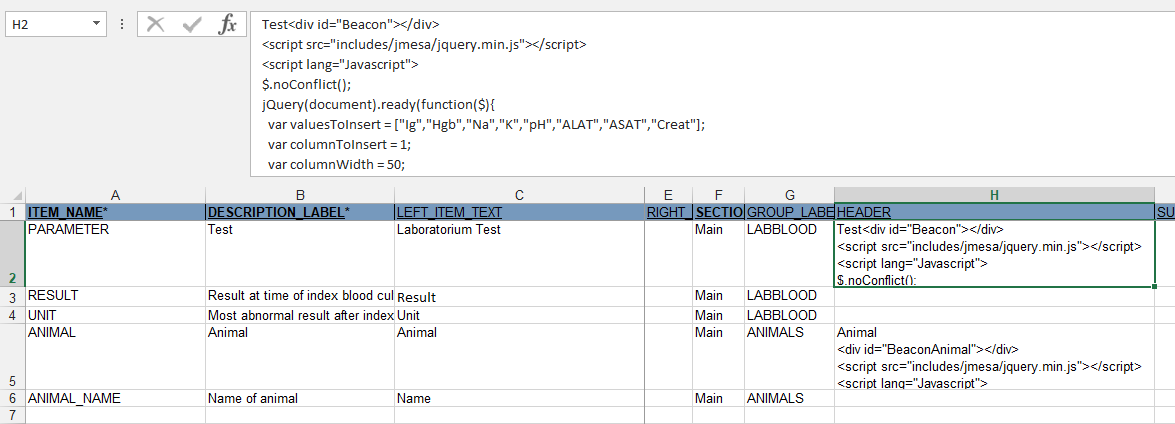
The code is put in the header column of the first item of the repeating-item-group and it is not so difficult, in fact it looks a lot like the code that was used to create an autonumber:
<div id="Beacon"></div>
<script src="includes/jmesa/jquery.min.js"></script>
<script lang="Javascript">
$.noConflict();
jQuery(document).ready(function($){
  var valuesToInsert = ["Ig","Hgb","Na","K","pH","ALAT","ASAT","Creat"];
  var columnToInsert = 1;
  var columnWidth = 50;
  //make a reference to the table we're in
  var MyTable = $("#Beacon").parent().parent().parent().parent();
  //define a counter
  var i = 0;
  var myInput;
  //define the function
  function setDefaults(){
    //loop through the tr's
    $(MyTable).children('tbody').children('tr').each(function(){
      //make a reference to the right input
      myInput = $(this).children('td:nth-child(' + columnToInsert + ')').children('input:text');
      //check if the input is already populated
      if(valuesToInsert[i] && myInput.val() != valuesToInsert[i]){
        myInput.val(valuesToInsert[i]);
        myInput.change();
      }
        myInput.attr("readonly","readonly");
        myInput.width(columnWidth);
      //increase the counter
      i++;
    });
  }
  //now call the function
  window.setTimeout(function(){
      setDefaults();
    },1);
});
</script>
First we define a div that will act as a Beacon and we call it Beacon. From this beacon we can refer to the table of the repeating-item-group
as the parent of the parent of the parent of our parent:
MyTable = $("#Beacon").parent().parent().parent().parent().
To keep things simple we define the values to insert plus the column in which to insert and also the width of the inputs we will use:
valuesToInsert = ["Ig","Hgb","Na","K","pH","ALAT","ASAT","Creat"]
var columnToInsert = 1
var columnWidth = 50
function setDefaults() is where it's happening: we loop through all the table-rows, and in each table-row
we take the first n-th child of type td, whatever we defined as the column to insert.
Once we're there, we can check if the value has already been inserted and if not, we do that and set the status to changed.
And to round things up we make the input read-only and set the width.
There's one more thing that needs explaining and that is window.setTimeout(function(){setDefaults();},1);. This function waits one millisecond and then executes the function and the thing is: it starts counting once the whole page has finished. "Mmmh, that sounds like document-ready and we already use that" you may say and yes, we do, but a grid in OpenClinica is built with the so-called repetition-model which makes one line of the grid and then copies it. JQuery doesn't wait for that, so your grid could be halfway, when jQuery tries to populate it. With setTimeout we wait for the repetition-script to finish and one millisecond later we start populating.
now tell us what animals you saw in Australia
After taking so much trouble to insert the defaults you may want prevent the users from deleting the rows. This can be done relatively easy, because the remove-icons all share the same class, called button_remove. Here you see the result:
fig. 2: CRF with remove-icons gone
The code is almost similar to the previous code:
<div id="BeaconAnimal"></div>
<script src="includes/jmesa/jquery.min.js"></script>
<script lang="Javascript">
$.noConflict();
jQuery(document).ready(function($){
  var valuesToInsert = ["whale", "wombat", "wallaby"];
  var columnToInsert = 1;
  var columnWidth = 80;
  //make a reference to the table we're in
  var MyTable = $("#BeaconAnimal").parent().parent().parent().parent();
  //define a counter
  var i = 0;
  var myInput;
  //define the function
  function setDefaults(){
    //loop through the tr's
    $(MyTable).children('tbody').children('tr').each(function(){
      //make a reference to the right input
      myInput = $(this).children('td:nth-child(' + columnToInsert + ')').children('input:text');
      //check if the input is already populated
      if(valuesToInsert[i] && myInput.val() != valuesToInsert[i]){
        myInput.val(valuesToInsert[i]);
        myInput.change();
      }
        myInput.attr("readonly","readonly");
        myInput.width(columnWidth);
      //increase the counter
      i++;
    });
    // now remove the remove buttons that are all of class button_remove
    $(MyTable).find(".button_remove").remove();
  }
  //now call the function
  window.setTimeout(function(){
    setDefaults();
  },1);
});
</script>
The difference is just one line, $(MyTable).find(".button_remove").remove(), that takes our table and removes from it all
objects of class button_remove.
You may think "can't we just do that for the whole form, as opposed to one table?" but it could be that you have on the same section
more than one grid and then you would like to apply the remove-action just on one.
fig. 3: where to put it
Other how-to-pages can be found here.
this page was last reviewed February 2018


