heads up: which version are we talking about?
Heads up: all the info below is relevant for OpenClinica-installations up to version 3.11.
In version 3.12 the function to migrate CRF-versions was introduced, as documented on
https://docs.openclinica.com/3.1/openclinica-user-guide/submit-data-module-overview/crf-version-migration#BATCH.
transfer existing data to a a new version of a CRF
How familiar is the following scenario for you? You've designed CRFs for a study and all involved are happy.
And then you go into production and after three months they come to you and tell you they want to add an extra item to
one of the CRFs.
You explain: that's OK, but it will be a new version of the CRF. But that's not what they want:
this new item must also be entered for all Subjects who already have data. And you don't want to enter all the existing data
into this new version: you just want to add the new item.
The above scenario probably happens in almost every Study, so we'll discuss a simple way to deal with it.
This only applies if you do not want to migrate the CRFs manually, because since version 3.1.3 you can transfer existing data
to a higher version of the CRF using the normal interface. If you want to migrate them in one batch, this is how to do it.
a word of warning
Even though we know what we're doing and we never ever make mistakes, it still is a good idea to practice the following procedure in a test-environment. And after practicing, why not make a nice backup of your database? And after that you can safely work in the production-environment.
the CRF
First have a look at the existing CRF, version 1: great if you like it plain.
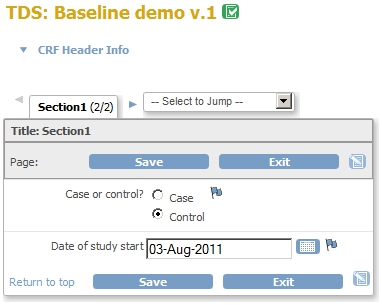
fig. 1: CRF with two items
But "they" want an extra item "Comments". First let's have a look at the damage. We go to the SubjectMatrix and choose the Event that the CRF is assigned to: Baseline. In the screen that appears we see a column with all the CRF completed so far. (OK, it's only three, but this is a demo.)
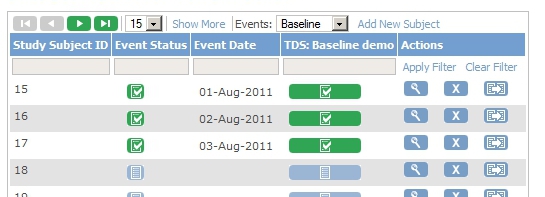
fig. 2: All subjects, with or without data for this CRF
exporting the data
The first thing to do is export the existing data by creating a Dataset. Click on "Tasks"-"Extract Data-Create Dataset". In the screen with some initial information, click on the button "Proceed to Create A Dataset". In the left column, under tab "Info", click on the Event "Baseline". The tree of CRFs opens, but in our case this is one CRF, "TDS: Baseline demo".
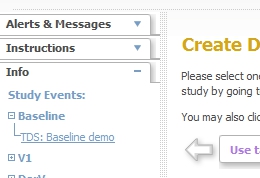
fig. 3: Creating the dataset
In the next screen, check "Select All Items" and then click the button "Save and Define Scope". This limits the results of the dataset to Subjects who have been enrolled in the period specified here. For our timeframe we want everything, so just click "Continue". Give your dataset a sensible name and description. Choose for Item Status "Data from All Available CRFs". Click "Continue" and then "Confirm and Save".
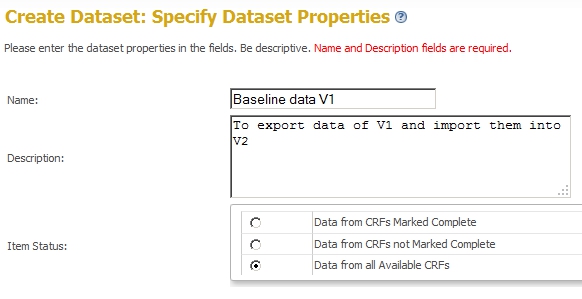
fig. 4: Naming the dataset
Now we are ready to run our export, all we have to do is choose the format. For this purpose we choose "CDISC ODM XML 1.3 Clinical Data with OpenClinica extensions". Click "Run Now" and then on "Back to Dataset". Download your Dataset to your client and open the zip. Save the XML file with an appropriate name, such as "data_baseline_version_1.xml".
adding the new CRF version
So now you're ready to add the extra item and after you've done that, you document. In the CRF-tab of your spreadsheet you write a new version, plus what's so new about this version.

fig. 5: Documenting
Add the new version and go to the "Build Study" screen. Set the default version of the CRF for Event "Baseline" to "v.2" Click "Confirm" and "Confirm and Finish". Now go back to the CRF list and scroll or filter until you can see our CRF with the two versions.

fig. 6: Two versions
We want to delete the CRF version v.1 with data, so we must choose the blue X-icon. Click the blue "Remove"-icon of V.1. A warning will appear that you are about to remove the version, plus all associated data. But this is what we want, so we click "Remove CRF Version". Click OK for the extra warning.
preparing the import-file
Now it's time to go back to the import-file. As I've said before, Notepad ++ is my favorite tool. Find the first occurence of <ClinicalData>. And yes, that is correct, above it are 20.000 + lines of definitions: impressive.
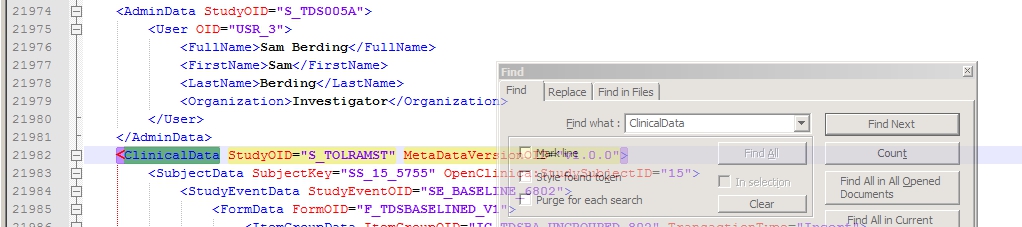
fig. 7: Start of Clinical data
But you do not need that, so you delete everything from this position of ClinicalData, up to the second line of your file, where it says "<Study OID=xxx>". Remove it all. And your file is almost ready, you only have to write the closing tag for Study: "</Study>". Your file will look something like this:
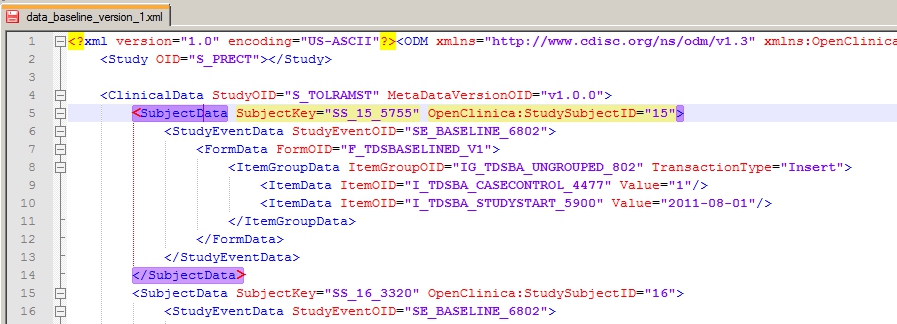
fig. 8: Start of Clinical data
And then the moment has come to "change" the CRFversion. If you do not know what the OID of the new version is, go to the View Study screen; click on the Event "Baseline". Next click on the magnifier-icon of the CRF "TDS: Baseline demo". And here you see your version-comments and you know 100% that you must replace "F_TDSBASELINED_V1" with "F_TDSBASELINED_V2". Do it using Ctrl-H with the "Replace All" button. Save your file.
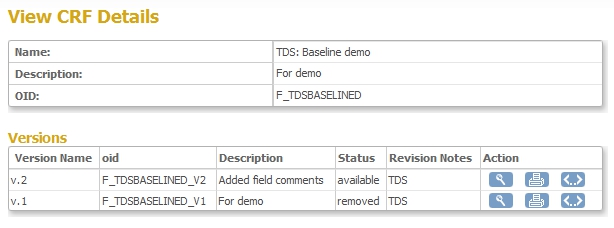
fig. 9: The two versions plus OIDs
importing the data
Now you can import your data. Click "Tasks"-"Submit Data-Import Data". Browse to the location of your file. Click "Continue". Review the results of the import action in the left column under "Alerts and Messages". Click on "Continue".
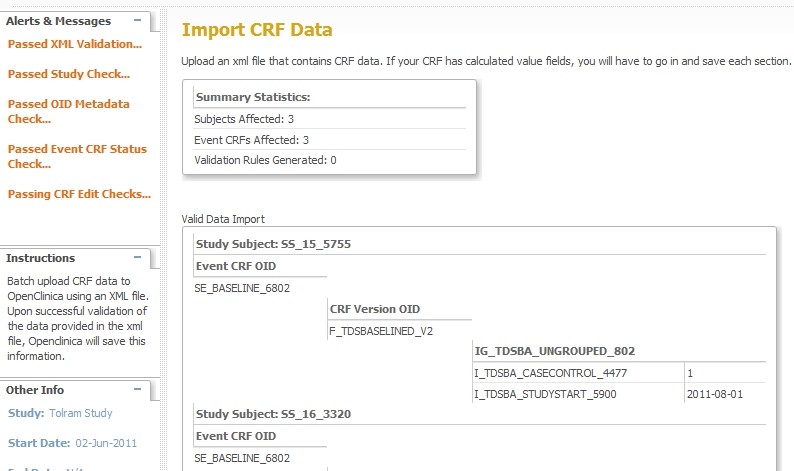
fig. 10: Report of import
and how does it look?
Let's have a quick look at how this looks:
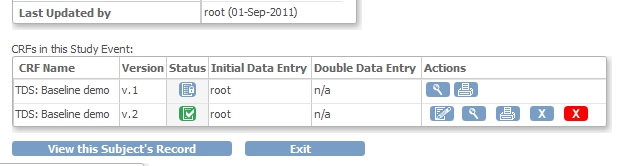
fig. 11: After the import
We see the CRF version 1 and we are still able to view the data. But version 2 is also there, and this we can edit. But hold on: the CRF is marked as complete, as a result of the import. This means we have to give a reason for change and whatever reason we give, we can not save the CRF! (OpenClinica tries to add a Discrepancy Note to a DataItem, but the DataItem does not exist.) The trick to remove the "Marked as Complete" status is to "Remove" the CRF. That's the blue cross-icon, no the red one. Immediately after we've done that, we restore it and now the status is set to "Data Entry Started" and we can edit whatever we like.
and my Discrepancies and Audit log?
The Discrepancies are something to handle with great care, because all open ones will be closed, due to the fact that the CRF is
auto-removed. So you will want to download the open ones by using a filter in the Discrepancies-screen and using the download option.
Then after the procedure you must manually recreate the Discrepancies and also the Notes: these will not be imported, even if they are in
your ODM-file. The reason for this is that N&Ds are not part of ODM, but of the OpenClinica-extensions and only
ODM data will be imported.
In your audit trail you will see the removal of the old version, then updates as a result of the import, Item data value updated.
Then when you remove the CRF we see that as Item data status changed to auto-removed and then back again to
available when we Restore it.
When we've inserted our data into the new item and marked the CRF as complete, this is recorded in the audit-trail
as Event CRF marked complete.
Other how-to-pages can be found here.
this page was last reviewed Feb 2018